Wednesday, December 28, 2011

'Tis the Season to Say YES!

It seems like so many people have gotten engaged in the past month! I guess it's just that time of year :) I was lucky enough to be able to make cupcakes, a cake, and cookies for three different couples who recently got engaged. These cupcakes are vanilla with a lemon filling frosted with vanilla buttercream, and chocolate cake with chocolate frosting.
In case you can't see them very well, the little wavy banners say "to have and to hold..."

Next up is a simple cake:

I was trying to think of a good, simple way to represent an engagement and thought this silhouette was really cute :)


Now here come all the pictures: cookies! These cookies were ordered for an engagement party and, aside from being told which colors would be used, I was given free reign over the design. I made a few different cookie shapes and put lines from the traditional wedding vows on them.


I started out with these adorable hearts:

Half of the hearts had full borders (as pictured above) and said "to love and to cherish," while the other half had a tiny heart just at the bottom and said, "as long as we both shall live."

I also did the traditional engagement thing and made ring cookies :)

I wrote on them "with this ring" and painted them with silver luster dust, and added some white sparkles to the diamond on top.

The next cookies are simple squares with the couples' names reading from top to bottom...

...and "to have and to hold" reading from side to side. Cute, no? :)

Here they are all together:

And here they are packaged up and ready to go! A cookie was left at each place setting at the party :)


Congratulations to everyone who has recently said "yes!" I wish you all the best of luck and lots of love for as long as you all shall live :)

Merry Christmas!

These little guys are in the Christmas spirit with their holly bowties on :) I bought this cookie cutter last year and never had the time to use it, so I was super excited to be able to make these penguin cookies for my friend's cookie exchange party!


I made this "wild" Christmas cake for my family's Christmas party. We do a gift exchange with different rules and themes each year, and this year's theme was "wild thing," so I made this animal-inspired cake and topped it off with a glittery Santa hat!


I hope you all had a wonderful Christmas and I wish everyone the best in 2012!

Monday, October 31, 2011

Happy Halloween!

I put together this spooky graveyard for the high school's staff Halloween festivities :)
Happy Halloween everyone! And, just because they're oh-so-funny, here's a picture which shows all the tombstones :)


Saturday, August 20, 2011

4x4 Poker Run Cookies

My dad is in a 4-wheeling club--you know, like Jeeps crawling over rocks and stuff? Anyway, every year his club, 4x4 In Motion, holds a poker run as their big fundraiser. So people from all over come up to camp out for the weekend, and everyone drives (or attempts to drive) along the Niagara Rim Trail and at certain points they pick up a card, and by the time they've completed the trail they have a full poker hand, and whoever ends up with the best hand wins some cash moneys. In case you wanted to know. The point, though, is that one night of the weekend there is a big raffle. This year, my dad bought two dozen cookies from me to donate to the raffle.

So, I started out with this cookie of the trail, based off a graphic from the 4x4 In Motion website. Aside from my imperfect handwriting, I was really happy with it :) Then, since it's the Poker Run, I added in some playing cards. I made at least one set of each different type of possible hand, from a pair on up, and then I made extras of the more fun ones, like a full house and a straight flush.

And, of course, I had to make some Jeeps! These ones, I think, came out a little bit better than the ones I made before, for my camping cookie platter.

Per my dad's request, since he drives a 4-Runner instead of a Jeep, I attempted to make a few 4-Runners and other trucks, but I wasn't very happy with them, so they don't get their own picture ;)

Anywho, they got packed up all perdy in a box and were ready to go!


I hope whoever won these enjoyed them!

Monday, July 18, 2011

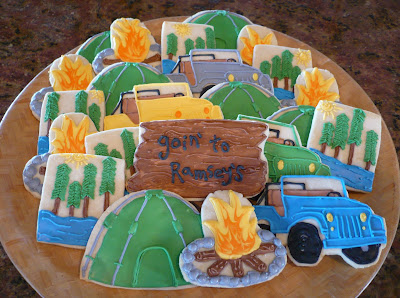
Camping Cookies

Every year, my family and some close friends go camping at this awesome spot in the Stanislaus National Forest which we call Ramsey's. And every year, a couple weeks before the trip, one of our friends has a barbecue so everyone can get together and plan for the trip (or, you know, drink beer, eat good food, and play wiffle ball golf). The barbecue was this past Saturday, and I made these cookies for dessert :)

My dad and uncles all drive their Jeeps down the trail, and some of us hike. Ramsey's isn't a normal campground; there are no showers or toilets, no RV hookups (it would be impossible to get an RV down the trail anyway--there's a reason they drive Jeeps), no hundred other people crammed into sites next to you. It's quite fabulous.

We have a lovely big campfire going the whole weekend. We use it to cook and roast marshmallows, then we stoke it up and just enjoy sitting around the fire talking and telling jokes.

We spread our tents out on various clear, level patches in the forest. We don't have to worry about other campers, because Ramsey's is private property, owned by a close family friend.

And we enjoy the beautiful view of pine trees, and the sound of the river, which we are lucky enough to have bordering our campsite on one edge.

I was going to put in an actual picture of Ramsey's here, but I forgot to add it initially, and Blogger hates me and doesn't want me to move pictures around, so....sorry. Instead, we'll move right along to a close-up of one of my Jeeps:


The Jeeps aren't quite perfect, but they came out far better than I was expecting them to. I'll be making more this week as part of a raffle prize for my dad's 4x4 club, so hopefully I can fix what I don't like about these ones :)

Projects for the coming week: 4x4 Poker Run cookies (more Jeeps!), possibly a Jeep cookie tutorial, and my brother's awesome birthday cake! (I haven't made the cake yet, but I am thinking positively.) See you real soon!

Tuesday, July 12, 2011

A Strawberry Cupcake Recipe

I made these ballet slipper cupcakes for a little girl's 6th birthday last weekend. Half of the cupcakes had ballet slippers, and the other half had the girl's inital, K. She wanted strawberry cake with chocolate frosting, which I liked because then the cupcakes were pink too ;)
I really like strawberry cake, and last year I tried out a TON of strawberry cake recipes. What I discovered is that it is very difficult to make strawberry cake using only strawberries. All of the cakes I tried, whether they called for strawberry chunks, strawberry puree, or strawberry jam, did not taste much like strawberry. The fruit left a vaguely sweet flavor which you could tell was not just sugar, but which was not easily discernible as strawberry. So I thought and thought about how I could make a stronger flavor and eventually decided to add Jell-O. I normally prefer to use only fruit in my fruit-flavored cakes, but sometimes ya gotta do what ya gotta do ;)
The Jell-O definitely helped, and the resultant cake was quite yummy! My only note is that this cake does not rise a whole lot, so you might want to fill your liners just a bit more than you normally would. So, for any of you who have had similar strawberry cake problems, here is my recipe ;) Some of the measurements are kinda weird, I know sixth-cups aren't commonly used, sorry bout that.

Strawberry Jell-O Cupcakes

Bake at 375. Makes 10 cupcakes.

4 Tbsp butter

9 1/2 Tbsp sugar

1 egg

1 tsp vanilla

1/8 tsp salt

5/6 tsp baking powder

5/6 C flour

1 oz strawberry Jell-O

1/6 C strawberry puree*

1/4 C milk

Whisk together flour and Jell-O powder and set aside. In mixer, cream butter and sugar. Beat in egg, vanilla, salt, and baking powder. Add the flour mixture in 3 batches, alternating with the milk and puree, and ending with flour. Beat until mixture is smooth.

Bake 18-20 minutes.

*You could probably substitute strawberry jam. However, to make strawberry puree, buy a bag of frozen strawberries. Place them in a strainer over a pot and let them thaw out. Stir/squish them occasionally to try and get as much juice out as possible (but don't squish them through the strainer, you only want juice in the pot, not strawberry chunks). This may take a long time. Once you think you've got all the juice, put the strawberries in a food processor or blender and blend until smooth. Meanwhile, set the juice over med-low heat on the stove and boil until it's reduced to about a quarter of the original amount. Don't stir, but swirl the pot around once in a while. Combine the juice and strawberries, et voila! Puree! Most people also add a touch of lemon juice, which is supposed to enhance the strawberry's flavor, but I often skip it.

Independence Day Treats

I made some goodies for our neighbor's 4th of July party this year. They ordered two dozen cupcakes and told me to do whatever I'd like :) So, I made a dozen margarita cupcakes (they do like to party), and a dozen of these colorful cuppies. These are super simple to make, and so much fun!

To create the tye-dye effect, divide your batter into as many portions as colors you want, and get dyeing. Then get out some spoons, and start dropping batter into liners! These would be really fun cupcakes to make with kids (as long as you don't mind a little mess) because they could have fun playing the with batter, and the process would go more quickly with some helping hands! For the best color swirls, don't drop all the batter of each color in at once, or you'll end up with something more like color blocks. I mean, unless that's what you're going for.

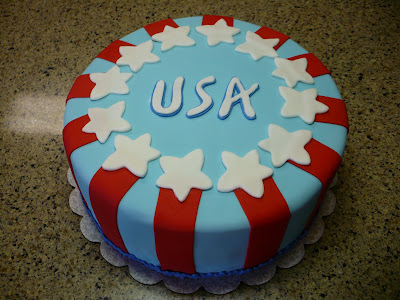
Anyway...remember the Disneyland cake I made for my friend? You should, it was only the last post before this one. So, like I said, I had a whole extra tier left over. I had already baked the cake and frosted it in buttercream, so I thought I may as well practice my fondant application, and I went ahead and covered it in fondant. Then I thought, oh my goodness, what am I going to do with a 5-inch tall 12-inch cake?? That is a lot of cake, and there are only two of us! The thought of wasting all that cake was painful to me, so again, I thought I may as well practice my decorating, and I turned it into a pretty red, white, and blue cake to take to our neighbor's party.

This was really easy and quick, and it came out pretty cute! Tiny dark blue stars around the base, red stripes, and white stars on top. I hand-cut some letters to make "USA" on top:


The first thing my husband said to me when he saw the picture was that I should have had 13 stars. Totally wasn't even thinking about that. Anyway, after this comment, he expressed the appropriate admiration ;) Since they weren't expecting a cake, our friends were quite surprised and pleased! Unfortunately, the hubby and I were sitting in a fireworks booth all day, so we didn't get to sample any :( But I'm sure it was awesome ;)

Sunday, July 10, 2011

DISNEYLAND CAKE!

My best friend since forever (and fellow Disney nut) had a birthday barbecue last weekend, and I wanted to make her a totally awesome cake. I had very grand plans for this cake, but I ended up with about two less days to work on it than I thought I would have, so I ended up leaving off a whole tier because I didn't get all the decorations made, and the ones that did get made aren't quite finished off as I'd have liked. But all in all, it still came out very well, everyone at the party loved it, and considering this is only the second cake I've ever covered in fondant, and that it's my first tiered cake, I'm pleased :) And they probably aren't too sad about that missing third tier, because that would have meant a ridiculous amount of leftover cake haha ;)
Aside from "Disneyland," of course, there is no overriding theme to the cake, I just wanted to incorporate a lot of different attractions.
Overall, the cake has a vintage resort entrance sign topper, Mad Tea Party cups, Billy Hill and the Hillbillies, Splash Mountain, Pirates of the Caribbean, the Monorail, and Sleeping Beauty Castle.
The topper and the Billys were my favorite elements. The lettering is all hand-painted and I am super, super happy with the way it turned out (except the "d" at the end kept wanting to fall off). The party was actually a joint affair for my friend and her mom; I'm not sure how well you can see it, but the little sign reads "PARK CLOSES EARLY TODAY FOR BETH AND AMBER'S EXCLUSIVE BIRTHDAY BASH."
And here's Billy Hill, with his brothers Billy, Billy, and Billy!
I always intended the castle to be 2D, as it is, but I was planning on adding the drawbridge on the ground in front of it. Ah well. I was also planning on putting a little stage on the floor for the Billys. It's little things like that which I completely ran out of time for. 

And finally, here is the birthday girl with her cake! Happy birthday Amber, I love you!!

Monday, June 20, 2011

Fairy Wings and Feral Hogs

I had an order over the weekend for some warthog cookies for a boy who was graduating from kindergarten (and yes, I know feral hogs and warthogs aren't the same thing, but that sounds catchier in the title, don't you think?). The boy asked for warthogs specially, which I thought was a bit of a strange request...I assumed he liked Pumbaa from The Lion King, because I couldn't think of any other reason why a kindergartener would want warthog cookies. Turns out he is a big fan of Discovery Channel and Animal Planet and African animals are his favorite--so there ya go! Anyway, warthogs are very strange-looking and really quite ugly. I tried my best to create a cookie that was at least a bit cute and still could be identified as a warthog; apparently the young graduate was pleased, so I count that as a success ;) Now you can judge for yourself:
I made a dozen just to put on a plate, and put a dozen more in cello bags with ribbon for the kiddos at the party to take home as favors :)

So, I was at my parents' house on Wednesday working on these (because I'm getting new countertops in my kitchen and currently have no countertops at all) when my husband called and asked if I'd have time to make a dozen Tinker Bell cupcakes for tomorrow! Our neighbors wanted to order them for their granddaughter's birthday....I knew I would still need a lot of time for the cookies, but since I'm a crazy person, I said yes. So these cupcakes were pretty last-minute; I baked and put them together Thursday morning/afternoon. Despite that, I think they came out pretty darn cute!
All the decorations are fondant; I thought I would just cut out a little Tinker Bell silhouette for a simple, quick decoration. I should know by now that the things I think will be simple and quick never really are. *Sigh* Anyway, cutting a teeny tiny Tink out of fondant with an Exacto knife is not the easiest thing to do. It doesn't help that Tink has such a small waist, or that the silhouette I chose has her weensy little arms and weensy little fairy wand sticking out. Also, once I had cut the silhouette, it wasn't totally clear that it was Tinker Bell. Since I couldn't cut out all the fine detail, like in the silhouette I had printed out, mine looked like it could have been some sort of deformed rabbit (the wings are the ears, see?). Luckily I managed to fix this pretty easily by drawing on the outline of Tink's dress, her shoes, her wand, and her hairdo. I also put some sparkle dust on her wings to make them stand out, and I am so glad I did!

Here's Tinker Bell scattering fairy dust on us all! I used a pretty floral-patterned rubber stamp to create the background. (In case you'd like to try this, place a piece of saran wrap between your stamp and the fondant; I'm not sure why, but apparently rubber stamps and fondant are not supposed to mix.)

Here's Tink among the flowers...

And here are the flowers by themselves, just because they're cute ;)


I am happy to report that the birthday girl was very pleased with these, as was her family! I'm also happy to report that I have cupcake orders every weekend for the next 5 weeks, so I should be around fairly often with new pics for you! So, see ya real soon!

Monday, June 6, 2011

Cooooookies! More Cooooookies!

I have been making a TON of cookies over the past two weeks. So...here they are!
Fancy red heart with gold detailing


And here it is packaged up all perdy-like :)


Sassy zebra-striped hearts ;)


Instead of just individual cookies, I've been making up lots of plates and platters. This one was for a simple backyard barbecue with some friends.


Butterflies, bees, daisies, and tulips.


Next was a platter for a weekend riding clinic. I hand-cut some cookies for the first time (the boots and hats below) and I was very pleased with how easy it was to cut the dough and how well they turned out (of course, cookie cutters are much easier, but it doesn't take nearly as long as you might think to cut cookies by hand).


Cowboy boots and cowboy hats!


Some red bandanna-print cookies to add a pop of color to the platter :)


And a pretty paint pony! All of the cookies for this platter were a lot of fun to make :)


Here they are all together! My parents just happened to have this platter which goes so very perfectly with the cookies.


Next up, some cookies to celebrate our league-winning track team! My husband and I both coach track at the local high school (my hubby is a teacher), and this year both the boys and girls teams won league championships! Good job athletes!!


It's hard to tell, but the gold parts are all sparkly. You can kind of see a little shimmer on the cookie on the bottom left.


Next up, a platter for a college graduate:


He is planning on becoming a history teacher, and he also coaches track, so along with the traditional caps and diploma scrolls, I made some track feet, history textbooks, and pencils.


And those are my cookies! Holy moly! Decorating cookies is a lot of fun, and I'm really enjoying making up cute platters, but making cookies is soooooooooooo much work! They take for-ev-er! After making cookies almost nonstop for the past two weeks, I'm glad to have a break ;) However, I hope to be making some more delicious creations soon, and of course when I do, I'll be back to share! 'Til then, ciao!